One of our employees received an email recently with subject line “Coronavirus update (COVID-19) {employees email address} your neighbors tested positive”. There was an attachment in .XLMS format. The body of the email read.
Download attach file for more details.
Stay informed on the global health pandemic with fast facts, updated numbers and trusted coverage all in one place.
Had a customer who wanted the title and description on the slider overlay to be delayed before it comes in. We struggled finding the appropriate setting in the module setting, but since it was site wide we decided to do this with CSS.
Go to “Customize” in the DIVI menu
Go down to “Additional CSS” and add the following.
We needed to add an event calendar to new WordPress site, and we decided to utilize Google Calendar. The customer has multiple sites, so we set up multiple calendars for each location but only show one calendar on the website with all the events showing. Below is a quick video of how we did it.
After finishing a new WordPress site we watched Google to see where the site was going to rank, but didn’t get the results we were looking for. We had the Yoast SEO plug-in installed and followed their recommendations in setting it up. The site was showing up on page 4 yet Google highlighted several matching words. More than the listing ranked higher.
We were confused as to why the other sites were ranking higher considering our site had more relevant links. If we add “va” for Virginia to our search the site was number 1 in Google.
The site was a Property in our Google Webmastertools / Search Console, and the Sitemap was in there. We saw a suggestion from someone else who said to add the sitemap in a line in your Robots.txt file. We did this through the Yoast plug-in in the back end of the site. We added the following line.
“Sitemap: https://www.thesitesdomain.com”
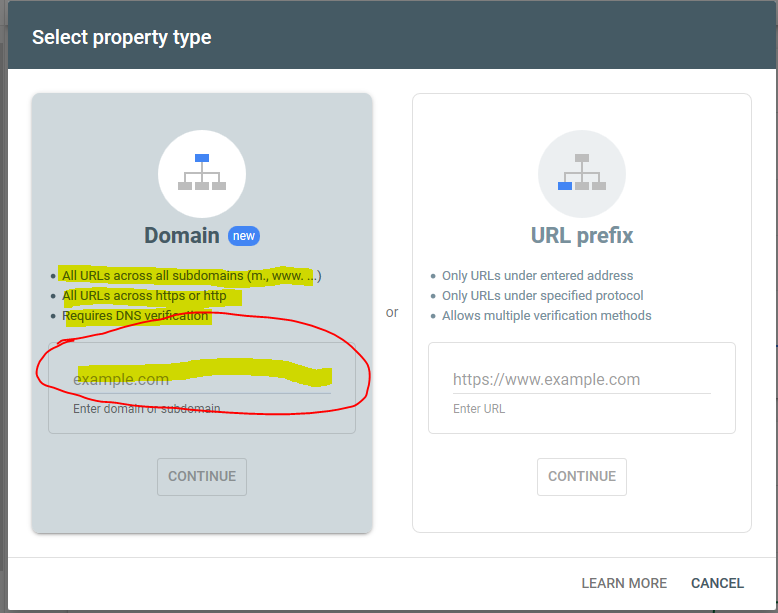
While in the Search Console we realized the Property was set up for HTTP. When we tried to do a URL Inspection we got an error that the property domain didn’t match. We went back and added the property again and we we saw the following image we realized we had trouble setting up the site with Google’s new domain verification and selected the old method of “URL Prefix“.
We added our domain to the “Domain” section and Google automatically updated our original property to be set up under the new “Domain” method. When we inspected the URL everything worked perfectly. Now to finish inspecting and requesting a URL crawl for the other pages.
The link below was a reminder to me that there were issues when were setting up this site in Google Search Console.
We recently started a new site using a purchased Child Theme for Elegant Theme’s DIVI theme, but when needed two map modules on the same page the map module wasn’t working. Not working in the sense the module won’t “find” the second maps addresses. It was putting the starting location way out in the ocean.
We discovered the “Row” setting were “Global“, and once the “Global” was removed the second map was now working normally. This did take way more time then it should have to fix, but that is how it goes sometimes.
We recently completed a Godaddy Managed WordPress site using the Elegant Themes DIVI builder. The site launched but we found that the site wasn’t ranking high in Google. The SEO strategy seemed good; however, simply adding a SSL may help.
Being short on time we decided to let Godaddy install the SSL. The manual method of installing a SSL with Godaddy can be rough. The next day we checked the site and noticed a some of the images were not showing up. We went into to site to investigate and got a warning that that the database was upgraded and we needed to click this button to okay it. Once that was done the images still were not showing up. In the media manager we got the same database upgrade warning. Once we clicked this warning the images in the media library showed up.
We did have to go back to each page that lost the images connection and just re-link them in the page builder. The image source for some images didn’t get the “https” and only had the “http“.
We had a customer who’s Drupal site got compromised and eventually banned. We stripped out all the old Drupal, and uploaded a minimal WordPress version of the site. The hosting was so sluggish that we often got time out errors trying to navigate the site. The back end was the same.
The host is Godaddy, so we contacted them regarding the issue. The CPU usage was pegged at 100%, but the there wasn’t anything else running. While searching the CPanel we discovered there was a Cron Job running.
Even after removing this the hosting was too slow to work with. We ended up going to the screen before you access the CPanel and choosing “Reset” to reset the entire hosting account. It took about 45 minutes before we could re-install the WordPress site.
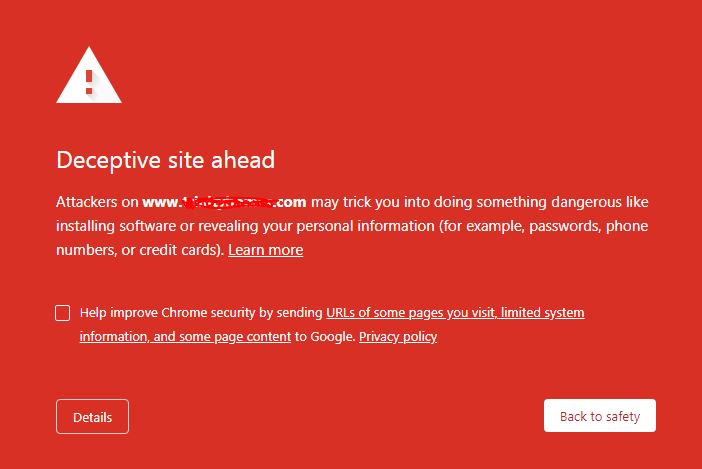
We have a customer who’s site recently got on Google’s Safe Browsing. After we cleared out all the old site files and upload a new temporary site we still got the following page.
Steps to Fix
Click on “Details” and see what the error is in Google’s Search Console. If the site isn’t in your Google Search Console you can add it as a “Property”. We had to use an .HTML file to verify ownership.
We have been getting phone calls from (240) 514-0971 and (352) 453-5733 which turn out to be a robo calls for fixing our Google listing. You are suppose to push a button to speak to a representative. When I push the button I got a person who tries to scam you to pay them to update your Google listing. When we asked them exactly what they would do they hung up on us. Anyone legitimately asking for your business would stay on the line.
We had an issue where when we hit the “FAX / SCAN” button to the control panel we would get the error “No registered one-touch destination available“. We could find the users in the machines “Address Book“; however when we tried to scan we couldn’t find a proper destination.
One of employees discovered when you hit the button “<<” to bring out the “slide menu” from the right side it said “SCAN / FAX” and here we would get the destinations. We knew the scanning service can still tie into our Address Book stored in the copier.
The following video showed us how to get the Main Screen on the copier to show the Main Menu and not the “Copier” menu.